latex与流程图 (pgf&tizk)
OO~
posted @ 2013年5月07日 08:45
in latex
, 23225 阅读
一直觉得在ubuntu下流程图的画法比较伤脑筋,昨天晚上耍了耍latex中的pgf和tizk包,感觉非常不错!值得推荐。
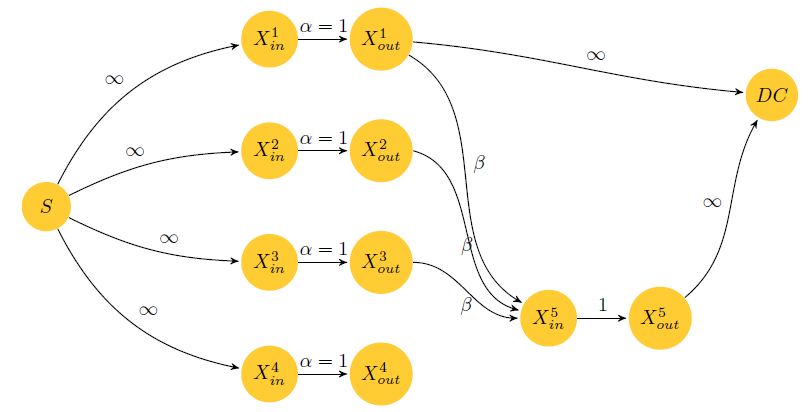
虽然这个包可以绘制出一些数学的图形,但是我不建议,对于数学方面的图形还是用python提供的库比较好一些。该库提供的语法很简单,但是内容却不少,不过还是比较好掌握的。下面给出我尝试绘制属于我自己的纠删码的图。

上面这个图的具体代码实现不超过100行,下面你会看到,不过老实说,颜色的配置还是花费了我比较多的时间的,因为latex只提供了6种基本的原色,所以其他颜色只有自己定义了,而且这里曲线的实现不是一个坐标坐标的移动,而是一句话就可以搞定的。多的话就不说了,个人觉得比较简单,具体代码可以看看如下:
\documentclass{article}

\usepackage{pgf}
\usepackage{tikz}
\usetikzlibrary{arrows, decorations.pathmorphing, backgrounds, positioning, fit, petri, automata}

\definecolor{yellow1}{rgb}{1,0.8,0.2}

%opening
\begin{document}
\begin{tikzpicture}[->,>=stealth',shorten >=1pt,auto,node distance=2.8cm,
                    semithick]
  \tikzstyle{every state}=[fill=yellow1,draw=none,text=black]

  \node[state] 	       (S) at (-6, 0)              {$S$};
  \node[state]         (xin1) at (-2, 3)           {$X^1_{in}$};
  \node[state]         (xin2) at (-2, 1)		{$X^2_{in}$};
  \node[state]         (xin3) at (-2, -1) 		{$X^3_{in}$};
  \node[state]         (xin4) at (-2, -3)       	{$X^4_{in}$};
  \node[state]         (xout1) at (0, 3)          {$X^1_{out}$};
  \node[state]         (xout2) at (0, 1) 		{$X^2_{out}$};
  \node[state]         (xout3) at (0, -1) 	{$X^3_{out}$};
  \node[state]         (xout4) at (0, -3)       	{$X^4_{out}$};
  \node[state]         (xin5)  at (3, -2) 	{$X^5_{in}$};
  \node[state]         (xout5) at (5, -2) 	{$X^5_{out}$};
  \node[state]         (DC) at (7, 2)       	{$DC$};

  \path (S) edge[bend left=26]              node {$\infty$} (xin1)
            edge[bend left=12]              node {$\infty$} (xin2)
            edge[bend right=12]             node {$\infty$} (xin3)
            edge[bend right=26]             node {$\infty$} (xin4)
        (xin1) edge  node {$\alpha=1$} (xout1)
        (xin2) edge  node {$\alpha=1$} (xout2)
        (xin3) edge  node {$\alpha=1$} (xout3)
        (xin4) edge  node {$\alpha=1$} (xout4)
        (xin5) edge  node {$1$} (xout5);
  \draw[->] (xout1) to[out=-30,in=150] node {$\beta$} (xin5);
  \draw[->] (xout2.east) to[out=-15,in=165] node [below] {$\beta$} (xin5);
  \draw[->] (xout3.east) to[out=0,in=180] node [below] {$\beta$} (xin5.west);
  \draw[->] (xout1) to[out=-5,in=175] node {$\infty$} (DC);
  \draw[->] (xout5) to[out=40, in=-120] node {$\infty$} (DC);
\end{tikzpicture}

\end{document}
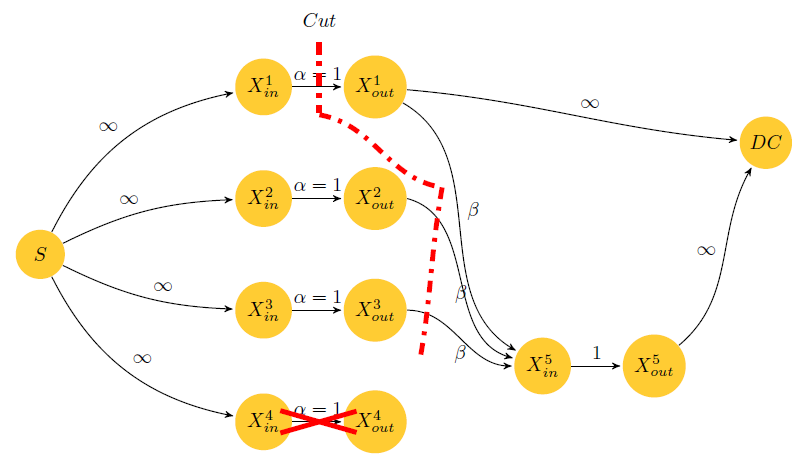
接下来这个图(纠删码毁坏一个节点的图)的绘制过程,是在上个图形的基础之上实现的,具体给出加入的代码(整体的实现算是比较明朗):
\draw[line width=2.5pt,red,-] (-1.7,-2.8)--(-0.3,-3.2);
\draw[line width=2.5pt,red,-] (-1.7,-3.2)--(-0.3,-2.8);

\draw[line width=2.5pt,red,dash pattern=on 6pt off 4pt on 2pt off 4pt,-] (-1,3.8)--(-1,2.5);
\draw[line width=2.5pt,red,dash pattern=on 6pt off 4pt on 2pt off 4pt,-] (-1,2.5) to[out=-10,in=170] (1.2,1.2);
\draw[line width=2.5pt,red,dash pattern=on 6pt off 4pt on 2pt off 4pt,-] (1.2,1.2) to[out=-100,in=80] (0.8,-1.9);

对于资料,我觉得看中文或者博客,还不如看原版的manualpgf,google之即可得到。
2013年5月07日 08:48
这个服务器终于可以登录了!!!!
2022年8月26日 10:24
Student Portal - Western Governors University. Access the WGU student portal here. Students can find instructions for initial log in to the learning portal for the university. This will give you access to the WGU Student Portal, my wgu which you will need to access in order to complete the financial aid process and/or make your first tuition 2021.Student Portal - Western Governors University. Access the WGU student portal here. Students can find instructions for initial log in to the learning portal for the university. This will give you access to the WGU Student Portal.